Well after using it for almost two years now I thought I’d write an update. I decided to up my game a little too so there have been quite a number of changes.
First of all I have worked to improve the vacuum attachment. I’ll update that information on my Vacuum page. I’ve wanted to add a touch plate for the Z-Axis for some time but I’ve been limited because of I/O ports. Plus I’ve been reading a lot about laser cutters and it seems to me I could probably easily add one to my existing CNC. Plus I read about a laser sight to make the X-Y alignment easier. So with all that in mind I embarked upon some major changes.
Laser Sight for X-Y Alignment
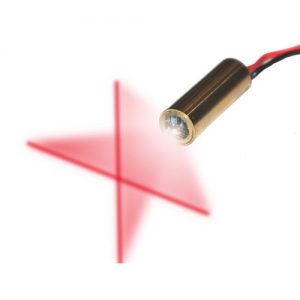
 So I wanted to add a new laser sight. This is connected to the router base and shoots a easy to see set of red cross-hairs onto the work table. The idea is that you line it up on the corner of your work piece and then press a button to execute a macro. That macro knows the exact distance (X and Y) between the cross hairs and the center of the router spindle so it can then do the math and set the spindle home position.
To do this I wanted the laser mounted so I don’t have to remove the dust shoe to sight it. The laser also has to shoot straight up and down, otherwise the measurement would change depending upon the heiight of the Z Axis. I also had to run a 5 volt wire to the router mount and add an easily accessible push on/ push off button next to the laser (Amazon $ 8.00 with LED light). I found the lasers on Amazon (2 pack for $ 9.00) and I bought a heat sink there as well. The heat sink really isn’t needed for this as the laser doesn’t get hot but it does make for a nice mount. That was also on Amazon for about $ 4.00. Total cost to add the laser sight was about $ 21.00.
I’ll cover the sighting macro in the software section below.
Computer Connection Upgrade
 The CNC hardware is made to communicate to the computer using the pins of a parallel printer port. Parallel printer ports have become somewhat obsolete over the last few years and are now difficult to get on a typical PC. Plus for some computers, such as laptops, it is hard to communicate exact timed pulses over the parallel port. So, knowing this when I built my CNC 2 years ago, I bought a UC100 controller for it. This plugs into the PC with a USB serial port and then converts those signals to a parllel port for use with the CNC hardware. This has turned out to work very well. Rumor has it that it can even work on a laptop computer too which the regular parallel port could not.
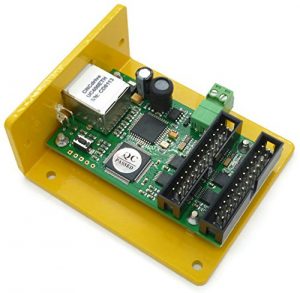
The only issue has been that the CNC uses the various pins on the port for communication and as I add more features I need to utilize more pins. It has extra “output” pins but I’ve always needed more “input” pins. So with this upgrade I changed out my UC100 for a UC400ETH. The UC400ETH simulates 2 printer ports instead of just one. It also now connects using Ethernet network instead of USB. This means in theory I can now have the PC driving the CNC located anywhere on my network although it seems I’d always want it close by. It also gives me plenty of pins for both input and output. I bought this from A Quick CNC for $ 150.00. As an added bonus it came with a free license for their UCCNC software which has turned out to be a critical piece of my upgrade.
Laser Cutter / Engraver
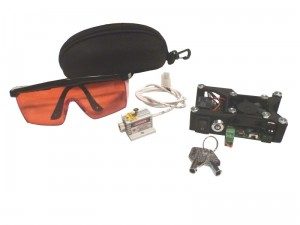
 I read up on lasers and decided the 2 watt laser is the best bang for the buck. I bought one off Amazon for $ 58.00 plus a driver board dir $ 26.00. Also had to be sure and get some laser eye protection goggles ($ 10.00). This worked well for testing but for the real production I decided to step it up to a little better. So I bought a 2.8 watt laser driver kit from J Tech Photonics for $ 350.00. It came with a great controller board, laser and heat sink. I also bought a cooling fan from Amazon ($ 9.00). The laser came with instructions for focusing and getting the current adjusted right. I am running it off 1 watt of power which seems to work great. It can be adjusted for up to 2.8 watts but that will decrease the life of the laser and I don’t need it at this point.
Software Upgrade
So I’ve always used Mach3 to drive the CNC and that’s worked pretty good. I did research and found that there is a screen upgrade put out for Mach3 called the “2010 Screenset”. It is not from the makers of Mach3 but from another company. I got this and put it in my Mach3. It worked really well. It changed the screen to be much more user friendly with more of what I want to see. It also had easy macros in it for the laser crosshair sighting. It also had features to do Z homing and bit changeouts (more on that later). All in all it was a cheap and easy upgrade to Mach3.
However, when adding the laser cutter I ran into all kinds of issues. You can setup Mach3 to drive the laser on/off from the spindle on/off in Mach3 but seems that Mach3 has a 500ms delay on those commands. This does not work for a laser. So instead people are using the undocumented M10 and M11 commands to turn a specific pin on or off to control the laser. There is a bug in Mach3 that these commands don’t work in specific versions but supposedly that was fixed. I found that indeed on my version of Mach3, although it is the latest, the commands do not work. This was a major frustration and took hours of work to determine. Since Mach3 hasn’t been updated or developed since 2013 I was stuck. There is a new Mach4 out but the documentation is scarce and the overall support looks weak at best. They even say that they really don’t work with everything yet and there is no conversion path to move all my configuration over to it from Mach3. All in all it wasn’t an option.
But, I did get that free license to UCCNC with the UC400ETH purchase so I deceided to try it out. I am impressed. They had a conversion program to read in the Mach3 configuration (why can’t Mach4 do that?) and although it didn’t convert 100% over it sure got most of it. With a few tweaks on my own I got it up and running. It has a robust macro ability and even comes with a lot of laser add-on tools as a bonus. At this point I have abandoned Mach3 and moved on to UCCNC.
Hold Down Vacuum

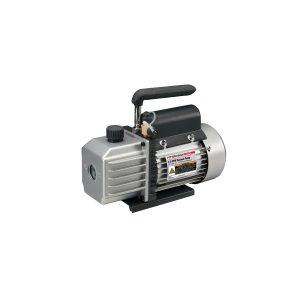 Although it can’t be used for everything, I made a hold down vacuum system. It will work for most of the smaller items and makes setup a breeze. To make this I purchased a vacuum pump from Harbor Freight ($100 minus 20% with my discount coupon). I also purchased the vacuum clamping clamping jigs, 2 position foot valve, filter and supplies from Veneersupplies.com (cost around $ 200.00). With this I made a great vacuum hold-down system that works really good.
Z Home
I have not yet completed this portion of the upgrade but I’m working it now. So what I’m describing here is all theoretical. I am building a small plate with a wire attached that can be placed under the Z axis. The CNC software will drop the Z axis until it comes in contact with the plate. Once it contacts it will note the position and then move the Z axis back up so I can remove the plate. It then knows the thickness of the plate and adds that thickness to the Z position to calculate and set the Z home position where the router bit will just touch the material.
In addition I will put another “fixed” plate over on the side of the table just within reach of the router but out of any normal work areas. Once the Z home has been done the macro will move the head over to the fixed plate, touch it and record the Z distance to it. Then as I am working the piece, if I need to change the router bit the macro will take the new bit over to the fixed Z plate, measure it and use the difference of that distance versus the original bits distance to reset my Z home automatically. This will make changing bits much quicker and much less error prone.
Other Upgrades
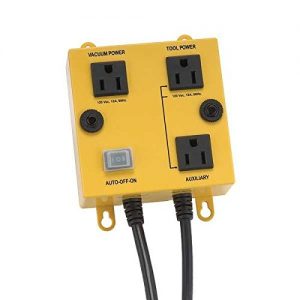
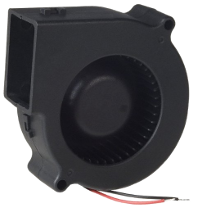
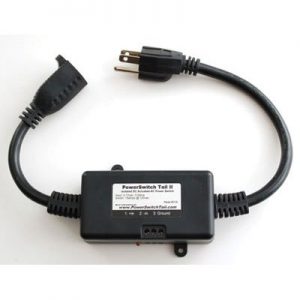 I also added a Vacuum switch and a “PowerSwitch Tail II”. The PowerSwitch allows me to turn on the router motor from the software and CNC controller. The Vacuum switch detects when the router motor is on and automatically turns on the vacuum. When the router turns off the vacuum shuts down about 15 seconds later. Using these I can now run the CNC on long tasks and have it shut the router and vacuum down automatically when it’s finished.
I also wired a 110v outlet from the CNC controller using the on-board relay. To this I connected my vacuum hold-down pump so it can also be controlled from the software. So now, in theory, all of the CNC devices can be totally software controlled.
During all the conversion and changes I also enabled the “Charge Pump” feature in the UCCNC software and on the controller board. This ensures that none of the servo motors move unless there is a special activating signal present on the controller. Rumor has it that without such a feature the motors could move when the computer is starting up and testing the various ports. I’ve never had this issue but this seems like a good safety feature to enable.
CNC Controller
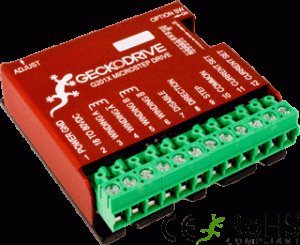
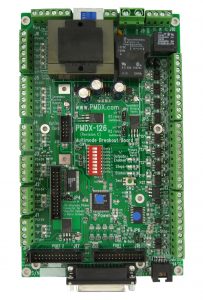 My CNC controller, which Ive had from the start is a PMDX-126 Revsion C board. I highly recommend it. It supports the two parallel ports and has tons of features, many of which I haven’t even tapped into yet. I also have four Gecko micro stepper motor controllers which have worked flawlessly for me. I’ve had these mounted to a piece of plexiglass sitting under the CNC for the last two years. With the upgrades I put it all into a box with cooling fans and mounted connectors to hook everything to the box. This took me almost 40 hours to do the wiring and mounting. Now everything plugs and unplugs quickly and it’s all neat and clean.
Now with all the upgrades I have the following:
- 2 x 4 router CNC table
- High Torque NEMA 34 servo motors
- PMDX-126 Controller
- Gecko Microstep Controllers
- UC400ETH Ethernet to Dual Parallel Interface
- Porter/Cable 892 2 1/2 HP Router
- Cross Hair Laser Sight for XY
- 2.8w Engraving Laser/Cutter
- Automatic Z-Home plates
- CNC Controlled Vacuum Hold-Down System
- CNC Controlled Router / Vacuum
- UCCNC Control Software

Recent Comments